SharePoint Online/2013 Replace no results default text ‘Nothing here matches your search’ from search results web part


As we all aware, SharePoint search have great potential to provide very powerful search solution. Couple of new webparts are added in SharePoint 2013, like Content Search web part for which I should use rather a word “Smart” search web part. With a new rendering mechanism, content search webpart becomes more and more simple to edit and customize. That mechanism is called “Display Templates” and these are based upon simple Json to HTML templates.

I recently has faced a project scenario, where I was asked to replace the part of search result web part and I provided a solution by updating search display template.

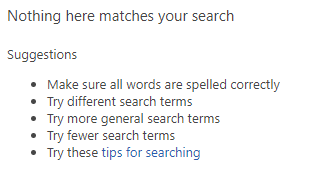
Requirement:  When we add a search result web part on any result page along with a search text box web part to enter search keywords. Search results will be displayed in web part if keyword matches any text. When we add both these web parts on page and before entering the search term also the results web part show  “Nothing here matches your search” (as shown in below image), which my users want to modify based on their content and want to add some useful links into it.

Blog1


Solution:

Initially, I thought that this may be easily updated using some web part property, but after researching about it, I found that there are html/json files called, display templates, which are responsible for rendering this text. Let me explain how to find them and which Display Template we need to customize in order to achieve our target.

All kind of Display Templates are stored at the one location under master page gallery. Here are the steps to reach out to the html file.

  1. Open the site collection.
  2. Navigate to Site Settings.
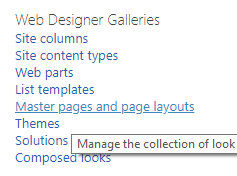
  3. Under Web Designer Galleries click on Master pages and page layoutsBlog2
  4. Now click on the folder Display Templates and then Search.     Blog3
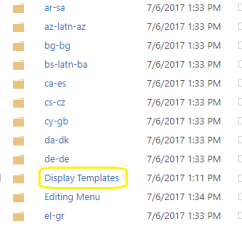
  5. Under the search folder you will find html and .Js files present.
  6. We are more intereste d in ‘Control_SearchResults.html’. Make sure you click in html file not JS file with same name.

If you are not familiar with this structure then you must be thinking that “Why JS and HTML files with two names?”

In brief, actually display templates are JS files only but just to the sake of simplicity MS has provided HTML so that it is easier to modify/edit display templates. There is out of box event receiver attached to this list when there is any modification detected in HTML file, a new version of JS will be generated by the event receiver. Display Templates are actually split into two different files, the Control and the Item.

Control Display Template

This is the part of your design that does not get repeated as each items gets loaded in the Search Results. It’s the container around and where you refer to any custom CSS or JS files you may want to use.

Put simply, it’s the box where search results will be loaded.

Item Display Template

This is where you design how each item will look like and which managed properties from the result item will be used and where on the design. If I take my example above, that’s all in the Item Display Template. The size of the rectangle, where the Title goes and where the Description goes as well as the animation itself.

Search Results web part of SharePoint uses ‘Control_SearchResults.html’ display template which is available under Master Page Library –> Display Templates –> Search.

Now lets start actual modification of the template:

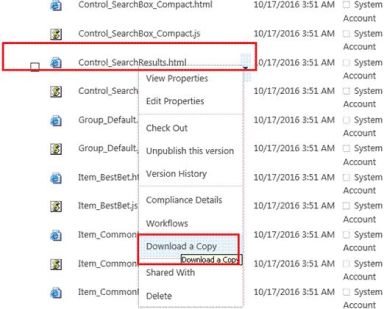
  1. Download a copy of ‘Control_SearchResults.html’. Click Control_SearchResults.html template file and Download a Copyblog5
  2. Rename the downloaded file as Control_SearchResults_Custom.html. Open the control template file in any of your preferred editors such as SharePoint Designer and customize the file, as per our need.blog6
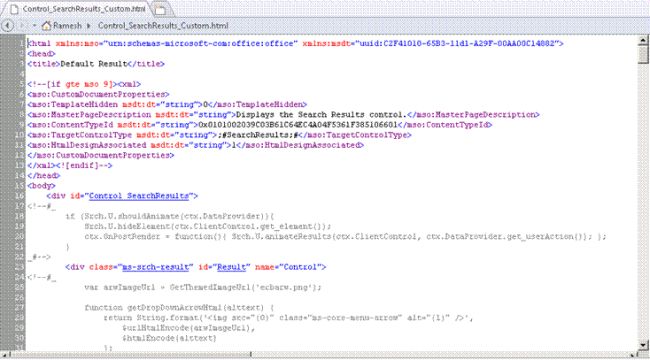
  3. Change the Title in this HTML file, this title will be available for selection in web part properties.
  4. Now we want to get the search text entered in to search box web part, for that we will use ctx object as following ctx.DataProvider.get_currentQueryState().k
  5. Search if(ctx.ClientControl.get_shouldShowNoResultMessage()){    line in HTML file (as shown in below image).
    Search_Result_SP_2013_Display_Template_1
  6. Find the unordered list just below that code and modify it according to your need.
  7. For example if you don’t want to show any message until user enters some keyword, replace if statement line with
    var currentQueryTerm = ctx.DataProvider.get_currentQueryState().k; if(ctx.ClientControl.get_shouldShowNoResultMessage() && currentQueryTerm!=””){
    (As shown in below image)
    Search_Result_SP_2013_Display_Template_2
  8. Save the modified HTML file.
  9. Go to Master Page Library –> Display Templates –> Search and upload new control template.
  10. You will see that respective ‘Control_SearchResults_custom.js’ will be created by SharePoint.
  11. Now go to your page where Search Result web part is added, edit Search results web part. Under Display Templates section select newly uploaded display template.( as shown in below image).Select our custom control display template.

  12. Save the changes and that’s it, you will see the  expected result.

Hope this information is helpful for you to modify display templates.

Happy SharePointing 🙂


Angular 5: Intallation and configuration with Angular CLI


Hi Guys,

In this blog, I am sharing how one can easily install angular (version 5.2.0). Angular 6 beta is out till date, which is not yet stable. Most of developers are excited to try one of the most modern and powerful frontend JS framework. Here is the quick guide to install angular 5 with CLI on development environment. I am choosing a stable version of Angular (5.2.0) for installation purpose in this blog.

Lucky, if you are familiar with Angular 2 or 4 and have good experience with it, the process of starting a new Angular 5 project is pretty much the same.

However, if you are new to angular and not having previous experience with Angular, don’t worry — installing Angular 5 is like a breeze. Let’s get started.

Pre-requisites: Here are the list of tools which you require before proceeding.

  1. Visual Studio Code/Visual Studio – Download
  2. Node.js – Download
  3. Node Package Manager(NPM)

To check whether or not you have both of these installed, visiting your commend line(Win + R => cmd) or console and type following commands:

node -v

npm -v

These commands should tell latest versions of Node and NPM installed on your system. For me these two versions are: node version is “v8.9.4” and npm version is “5.6.0”. If either of these commands are unrecognized, visit the downloads section of Nodejs.org and download/run the appropriate installer based on your OS.
Follow through the installation steps with default settings, which will install NPM by default. Once finished, reload your command line / console and retype the above commands — they should now give you version numbers.

NOTE: In case you are working offline, it is hard to get/download packages unless you are connected to internet or some local package manager. In order to install/configure custom local package manager execute following command with change of local URL:

npm config set registry “<URL of package manager URL>”

Installing Angular CLI: 

The Angular CLI makes it easy to create an application that already works, right out of the box. It requires Node 4 or higher and npm 3 or higher. Now if you are successfully installed node and NPM next step is to install Angular CLI.

PS > npm install -g @angular/cli@latest

This command might take some time as it installs all the dependencies related to CLI and packages. Once CLI is installed you can verify and check the version by executing this command:

PS > ng -v

The output screen will look somewhat like this:

My version of CLI is 1.6.6. Great, That’s it. We are ready to start our first angular application. Here is the command to create a base project using CLI:

PS > ng new my-first-angular-proj –style=scss –routing

The style flag is provided in case we want to use SASS compiler for creating CSS, and another flag –routing is used to provide us with the routing scaffolding.

It will take several minutes depending upon internet connection. Once completed it will show following message:

So its all done! Now on the command prompt navigate into the new project folder. To do that, simply type:

PS > cd my-first-angular-proj 

To serve your project in the browser, which is useful for development as it automatically compiles your project and reloads it in the browser, type:

PS > ng server

And that’s it! You have a fresh copy of Angular 5 ready and waiting for you to develop.

Happy Angular Coding 🙂

SQL Server install error Wait on the Database Engine Recovery Handle Failed


Hi Guys,

Last week during the installation of SQL Server standalone instance, I have faced an issue. After installing all the prerequisites and I started installing SQL Server. Though, I did not get any warnings or errors in any of the rules or steps during the SQL Server installation wizard, but I got the below error at the end of the installation:

The following error has occurred:
Wait on the Database Engine recovery handle failed. Check the SQL Server error log for potential causes.

This issue is giving misleading message. Well, I could not able to understand the cause of this error. I followed standard installation guide and completed pre-check before proceeding installation of SQL Server, but I still got this issue. In this blog, I will explain how did I resolved this issue.

After many rounds of troubleshooting I decided to do some research on the web.  This was the first time I got this issue, so I had no clue about how to fix except for reading and analyzing the error log files. Interestingly, I found multiple solutions to fix this issue over the internet. Below are three options which can be used to fix this issue. I will explain the first in this tip and the remaining in future tips.

  1. Fix it by uninstalling SQL Server and then reinstalling
  2. Fix issue by using sa account
  3. Fix using by creating a login post installation and connecting to the instance in single user mode

This error comes about because the account which the user selected on the Server Configuration page during installation is somehow not able to bring the SQL Server database engine services online. Either it lacks privileges or it is corrupted. During installation of the database engine services, SQL Server tries to bring online the database services as an internal process, but due to the startup account either being corrupt or not having the appropriate privileges it fails to do so and ultimately the installation fails. There might be a possibility that someone had tried to install SQL Server previously on this machine, but failed to do so and they did not clean the machine properly during the uninstallation.

Wait on the Database Engine recovery handle failed.  Check the SQL Server error log for potential causes.

When you click on OK button after reading and analyzing the error, the below screen will appear confirming that a few of the features failed to install.

SQL Server features failed to install

I decided to review the error log file to find out more about this error, but I did not get much from the error log file as shown in the below screen shot.

SQL Server Error Log File

To move forward, I will uninstall this SQL Server instance and then reinstall it again with some minor changes. Let’s go ahead and uninstall it using the “Add/Remove Program” feature in Windows. If you are not able to remove SQL Server instance then you will need to do a manual uninstallation to clean the machine. Make sure to remove all SQL Server related files from the system as well as the registry. Before removing anything from the registry create a backup of the registry first. I uninstalled this instance successfully and proceeded with the next step.

Restart your machine after successful removal of the SQL Server instance. Now go ahead and launch the SQL Server setup again to start the SQL Server installation.

Fill all the required details and click on Next buttons to proceed until the “Server Configuration” page. You can see below that the SQL Server database engine and SQL Server Agent service account is configured to run with NT AUTHORITY/NETWORK SERVICE and NT AUTHORITY/NETWORK SERVICE. Our last installation failed due to this, so here I will change these service accounts to use the local System account to run the installation.

Note: The “Network Service” is a built-in local account used by the service control manager.This account is not recognized by the security subsystem, hence you cannot specify its name in a call to the Lookup for Account Name.

To lookup  “Network Service” account name, in location select “local machine” instead of Entire Directory.

We can change both service accounts to local System. On the SQL Server Database Engine and Agent service, click the drop down option to select user NT Authority\NETWORK SERVICE which is also known as the local system account.

Now click on the Next button and proceed with the installation by filling in the required details and clicking on the Next buttons until the end of the setup. Installation should now proceed and finish with a green status for all features as you can see in the below screenshot.

SQL Server Successful Installation

Now you can check the SQL Server services to make sure they are running. You can also connect to the database instance and run some queries to check that things are working properly.

Hope this help you.

Thanks