You can easily set default value to text field, drop down control using Default property in Power Apps forms. But if your are dealing with SharePoint list and you have SharePoint people/group field which you want to get automatically populated value from the context, how can you achieve this ? This control also has Default property but you can not just enter person email or account Id or any other field. This blog explains how we can get that done.
Solution
Have a look on the solution here. I am assuming that you have already created a powerapp custom form using the list custom forms option and you have already added an column of type people/group. If you are not yet done all these steps, I suggest you to customize the list form and reach till the point where form will have all default data cards added to screen. Now, open your PowerApps app. Open the screen which has a Form with Person or Group field added on it. In below screenshot, Employee is Person or Group field. So, my requirement is that whenever users try to add a new record, I want to keep a specific person as selected automatically (default) in Employee field.
Here are the steps:
Select Employee data card
Click on “Unlock to change properties” from Advanced menu
Select the value control inside the data card as shown below
I have selected Employee_DataCard1
From left top side drop down many select “Default” property
Below is the format of data, this is how we need to set it; then only it detects it as User object and accepts the input.
We need to set same value to “DefaultSelectedItems” Property as well. This is required step, as only then will it work.
As you can see in the below screen it shows Mohit Vashishtha users as selected already by default.
Once your changes are done. Save the form and do a test to add a new record as shown below. It will show logged on user as selected by default. You can make any user selected by default, it can be current user, current user’s manager or HR manager etc.
It sounds easy but believe me it is not so easy that it sounds like. There is no direct way that you can embed an image when you are drafting “Send Email” action even when you are planning to use HTML code in email body. There is a way to add a Image html tag but question is what will be the URL/SRC for same. Suppose you want to place image url which is exposed on internet, accessibility set to public, in that case you saved your time. Just use the URL in image tag and it will work.
So just wanted to mention one more important thing here. Email can we viewed by multiple means: MS Outlook or from Browser. The behavior in both the cases will be different. I have observed the behavior that sometimes when email is opened using browser it renders images perfectly but when same email was opened using MS Outlook app, images shows just cross marks. May be due to the reason the images can easily be accessible using browser but Outlook it may require some extra steps.
After spending two or three days, trying different options, I finally got a solution which works in all cases.
Problem:
Using Microsoft Flow, trigger sending of an email with an embedded image.
The image will be stored in a SharePoint Library/One drive
We will assume you have already created connects to:
Office 365 Outlook
SharePoint/Outlook
Solution:
Create a new Flow:
Select: +New > Instant—from blank
Click: Manually trigger a flow
Add the 1st actions:
Search for SharePoint > Get file content using path
Select the action
Site Address: either select or ‘enter custom value’
File Path: enter the path from the site collection (e.g. ‘/Style%20Library/DemoFile/EmailCompanyLogo.jpg’)
Placing you cursor before the .$content click: Dynamic content
Locate and select File Content
Click OK
Add the 3rd and last actions:
Search for Office 365 Outlook > Send an email
Select the action
To: enter your email address
Subject: Microsoft Flow: How to embed an image in an email
Body: <p>This is my test email, you should see an image below</p><p></p>
Click between the last <p></p> tags
Click: Add dynamic content
Locate and select the ImageTag variable
Is HTML: Select Yes(Note: you may not able to find this option in new versions of the action. In new versions, there is option looks like “</>” at top right corner of the action which converts body in html. Here is the screen shot for same)
Note: The other way to implement the same requirement is to attach as attachment to the email action. Provide file content as Attachment Content and image will be rendered as usual.
Please feel free to hit like button in case you find the content of this bog helpful.
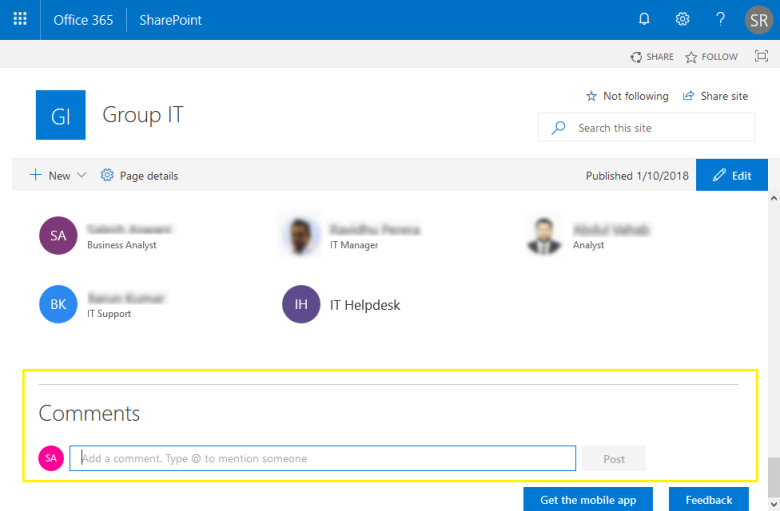
Requirement: SharePoint Online has awesome feature at every modern page called “Comment Section” which usually displayed at bottom of the page for better collaboration. My client has requested that they do not want to provide this option to their users. So requirement Disable page comments in SharePoint Online Modern Sites and Communication sites.
Solutions
Option 1: Disable Comments at the tenant level
Page comments can be turned-off at tenant level by the below settings:
On the Settings page, Select “Disable Comments on Site Pages.”
Click OK to save your changes.
Wait for a while, the comments section disabled from all pages in the tenant. You can disable comments on modern pages at tenant level using PowerShell as well:
$AdminCenterURL="https://crescent-admin.sharepoint.com"
#Connect to SharePoint Online
Connect-SPOService -Url $AdminCenterURL -Credential (Get-Credential)
#Disable Comments on Site Pages at Tenant Level
Set-SPOTenant -CommentsOnSitePagesDisabled $True
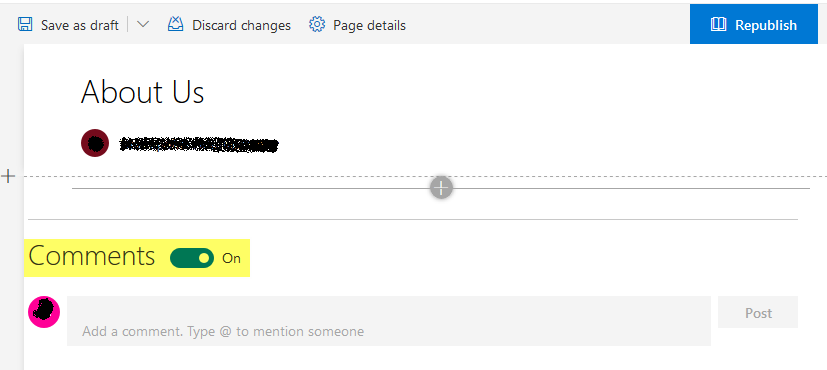
Option 2: Disable Comments at the Page Level
Comments can be disabled at page level. Here is how:
Navigate to the SharePoint Online Site page >> Edit the page.
Turn off the comments by toggle the switch from ON to OFF position and Publish the page.
This disables comments section in the particular page.
Option 3: Disable Comments in SharePoint Online Pages using PowerShell
This PowerShell script disables the page comments for given site.
#Load SharePoint CSOM Assemblies
Add-Type -Path "C:\Program Files\Common Files\Microsoft Shared\Web Server Extensions\16\ISAPI\Microsoft.SharePoint.Client.dll"
Add-Type -Path "C:\Program Files\Common Files\Microsoft Shared\Web Server Extensions\16\ISAPI\Microsoft.SharePoint.Client.Runtime.dll"

#Config Parameters
$SiteURL="https://crescent.sharepoint.com/sites/GroupIT"

Try {
    #Get Credentials to connect
    $Cred= Get-Credential

    #Setup the context
    $Ctx = New-Object Microsoft.SharePoint.Client.ClientContext($SiteURL)
    $Ctx.Credentials = New-Object Microsoft.SharePoint.Client.SharePointOnlineCredentials($Cred.Username, $Cred.Password)

    #Get the Web
    $Web = $ctx.Web
    $Ctx.Load($Web)
    $Ctx.ExecuteQuery()

    #Disable Comments in Site Pages
    $Web.CommentsOnSitePagesDisabled = $True
    $Web.Update()
    $Ctx.ExecuteQuery()
    Write-host -f Green "Page Comments has been disabled Successfully!"
}
Catch {
    write-host -f Red "Error:" $_.Exception.Message
}
Please note, disabling comments doesn’t delete existing comments on pages. It just hides them. Turning ON comments brings the comments back!
PnP PowerShell to Disable Comments on All Pages in a Library
#Parameter
$SiteURL= "https://crescent.sharepoint.com/sites/marketing/2018"
$LibraryName = "SitePages"

#Connect to PnP Online
Connect-PnPOnline -Url $SiteURL -Credentials (Get-Credential)

#Get all Pages from the Library
$Pages = Get-PnPListItem -List $LibraryName

#Loop through each Page
ForEach($Page in $Pages)
{
    #Disable Comments
    Write-host "Disabling Commnets on page:"$Page["FileLeafRef"]
    Set-PnPClientSidePage -Identity $Page["FileLeafRef"] -CommentsEnabled:$False
}
Do not forget to hit like in case you find this blog stuff helpful. Happy SharePointing !!!!!
If you have developed a SPFx solutions, it is important to configure this setting at your tenant level. We have recently faced an issue where external user/guest users are not able to see the webparts because CDN is not configured at tenant. For developers, to enable hosting your SPFx solution from SharePoint, you need to have “includeClientSideAssets” as “true” in the package-solution.json file. This configuration is also typically ignored when building debug builds (bundle without –ship).
Any of the document libraries in the SharePoint Online tenant can be promoted as a CDN, which will help to serve the JS files for SPFx client web parts hosted in SharePoint. This CDN location, being public, can be accessed easily. To configure the CDN in Office 365 follow the below steps,
Examine existing configuration of Office 365 tenant
Run below set of commands to review the existing Office 365 public CDN settings on your tenant. This command will return the status of CDN. True if CDN is enabled, false otherwise.
Get-SPOTenantCdnEnabled -CdnType Public
Next, in order to see the CDN Origins which are made public execute this comment
Get-SPOTenantCdnOrigins -CdnType Public
This command will return the location of already configured CDN origins. The URLs are relative. In the first instance, it will not return any values as CDN is not yet set up.
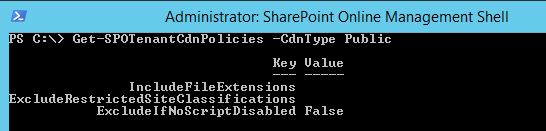
Now, to view the policy settings for CDN Run below command to enable the CDN
Get-SPOTenantCdnPolicies -CdnType Public
Enable CDN, Origins and Policies for connected tenant
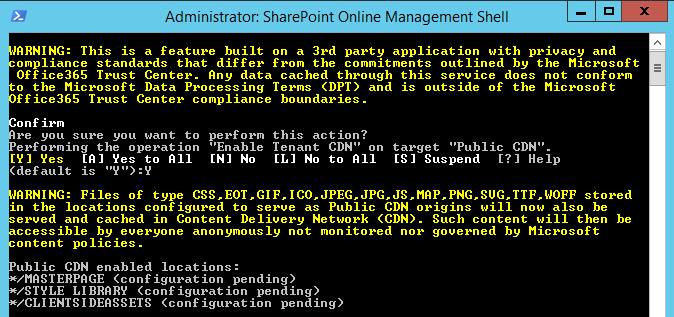
Now in this step we will actually going to modify the tenant configuration for enabling CDN. Execute below command in order to enable CDN:
Set-SPOTenantCdnEnabled -CdnType Public
After enabling the CDN, */CLIENTSIDEASSETS origin is by default added as a valid origin. By default allowed file extensions are: CSS, EOT, GIF, ICO, JPEG, JPG, JS, MAP, PNG, SVG, TTF, and WOFF. The configuration takes up to 15 to 20 minutes. To check the current status of CDN endpoints, run below command
Get-SPOTenantCdnOrigins -CdnType Public
The origin will be listed without (configuration pending) status when it is ready. Please be patient for 15 to 20 minutes until it is ready. Once CDN origin is ready, the output will be as below.
Please do not forget to hit like in case you like the stuff I posted. Cheers !
Open SharePoint Site and go to Library Settings of document library where you want to configure Information Management Policies.
On Library Settings Page click on the Content Type for which you want to configure Information Management Policies. E.g.:
On Content type settings page click on “Information management policy settings”
On Edit Policy Page, click on “Enable Retention” checkbox so the Add a retention stage link will be visible. Click on Add a retention stage link.
On Stage properties dialog specify following input for time period:
Select “Created” field in the columns dropdown.
And specify 0 in the textbox and select days in the dropdown.
On Stage properties dialog select “Start a workflow” in the action dropdown and in start this workflow dropdown select the workflow that you want to start and click on OK button in the dialog.
Click on OK button on Edit Policy Page.
Change the schedule of Information management policies timer jobs
Open SharePoint Central Administration Site and go to Monitoring -> Review job definitions.
On Job Definitions Page, look for the “Information management policy” timer job for the web application where you have configured Information management policy on document library.
On Edit Timer Job Page change the schedule to run every 1 min as follows:
Select Minutes radio button.
And specify 1 in the textbox.
Click on OK button.
Again go to Job Definitions Page, look for the “Expiration policy” timer job for the web application where you have configured Information management policy on document library.
Select Minutes radio button.
And specify 2 in the textbox.
Click on OK button.
Now workflow will be triggered approximately 3-5 minutes after a new document or form is created in your library using the content type for which you configured Information management policy.
Notes:
If you do any changes in workflow publish the workflow after configuring the information management policies then you will need to update the workflow in Information management policies settings as follows:
Go to Information management policies settings of content type as mentioned in above steps(1 to 3)
Click on “Edit” option for the retention policy.
If you see the workflow then it must be showing Previous version in the Start this workflow dropdown as shown in the below screen shot.
So change the workflow in the Start this workflow dropdown to the actual workflow that you want to run and click on OK button.
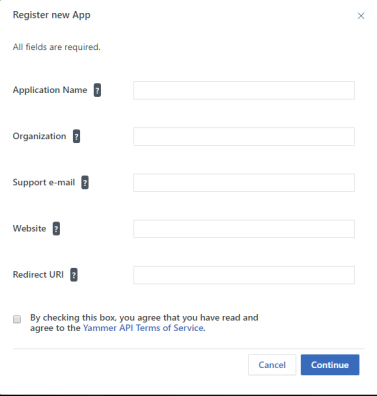
While working with cloud platform you might face any random requirement from your clients. I was asked if it is possible to work with yammer using Powershell commands. My first thought was it should not be easy to do but with very first internet search, I found REST APIs which are exposed by yammer and can be utilized anywhere with developer token. I am sharing my first very basic yammer powershell command in this blog, I will explain how to get all of the Yammer groups using PowerShell.
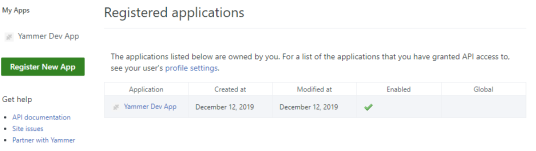
Once the app is registered, you can view details of newly created app under list of applications.
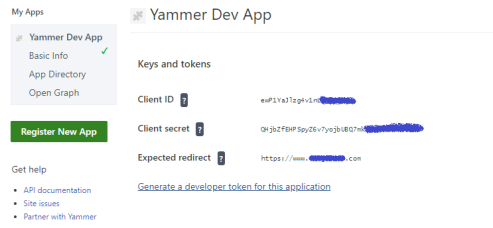
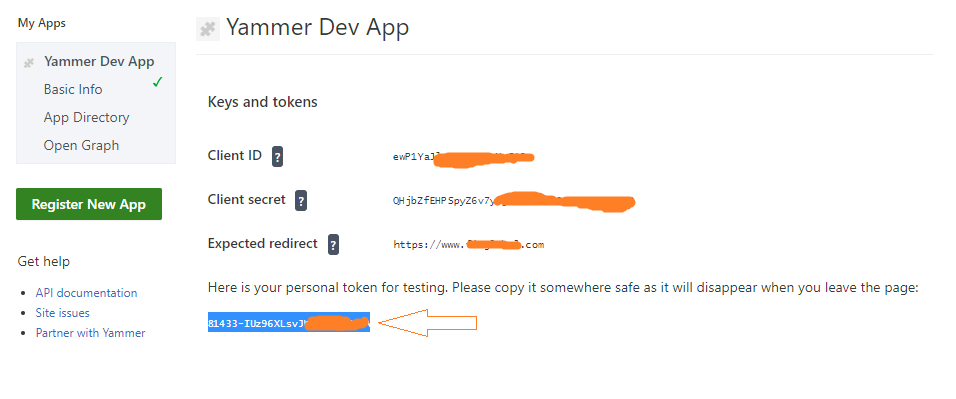
Step 2: Grab developer access token
Once the app is registered, navigate to Basic information tab and find out a link “Generate a developer token for this application” to generate a developer token.
Step 3: Create PS script file with commands
Copy the below script and paste it in a notepad. Save the file as AllGroups.ps1.
# Input Parameters
$developerToken = "12240-*****PR2NWpZVtnbXYw"
$uri="https://www.yammer.com/api/v1/groups.json"
$headers = @{ Authorization=("Bearer " + $developerToken) }
# Invoke Web Request
$webRequest = Invoke-WebRequest –Uri $uri –Method Get -Headers $headers
# Check whether the status code is 200
if ($webRequest.StatusCode -eq 200) {
# Converts a JSON-formatted string to a custom object or a hash table.
$results = $webRequest.Content | ConvertFrom-Json
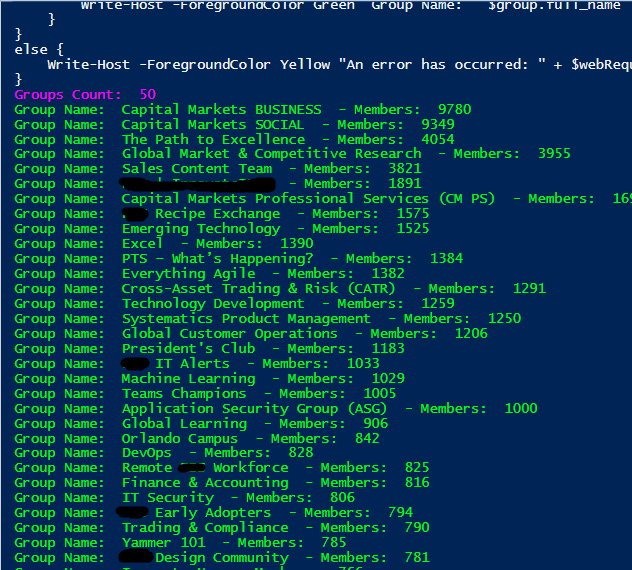
write-host -ForegroundColor Magenta "Groups Count: " $results.length
# Loop through all the groups
$results | ForEach-Object {
$group = $_
# Display the group name and members count
Write-Host -ForegroundColor Green "Group Name: " $group.full_name " - Members: " $group.stats.members
}
}
else {
Write-Host -ForegroundColor Yellow "An error has occurred: " + $webRequest.StatusCode + " Description " + $webRequest.Status
}
Open PowerShell window and run the following command.
>cd “<folderlocation>”
folderlocation – YammerGroups.ps1 file location.
Run the following command.
>.\YammerGroups.ps1
So here is the list of groups that it returns:
Hope this blog helped you ! Do not forget to like and comment. Happy SharePointing !
In this post, I will explain how you can display the any user manager’s information in search display template. I assume here that you already have search configured on your SharePoint environment and basic knowledge of managed properties and search display template.
SharePoint introduced a technique for presenting search results: Display Templates during its 2013 release. If you have worked in previous versions of SharePoint and had to modify the look and feel of Search Results you know how cumbersome it is. After SP 2013 this rendering techniques have several distinct advantages.
Display templates are HTML and JavaScript rather than XSL
Display templates are configured for the Site and Site Collection rather than for a Web part
Display templates are applied with rules and logic
Display templates are applied to individual result items, not the entire result set
Display Templates are used for Results of all kinds, search results, content by search results, and refiners
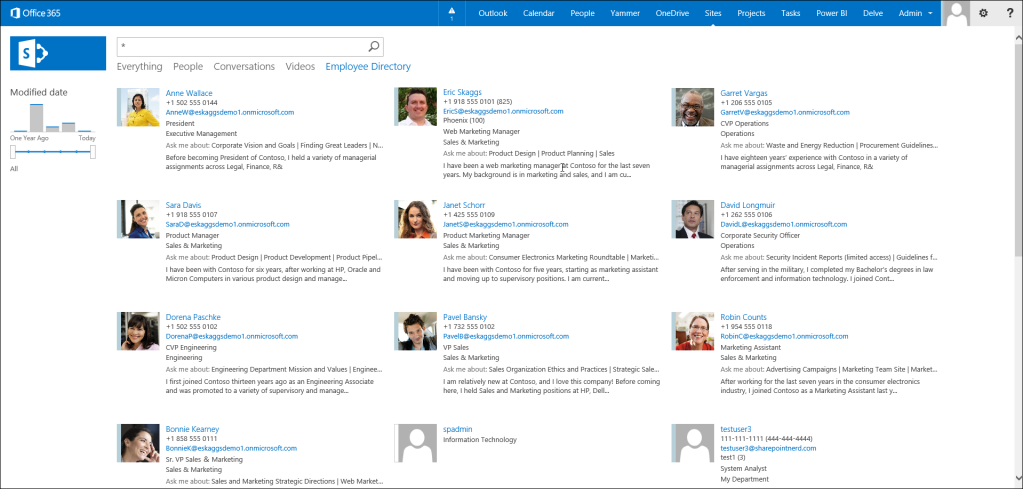
If we talk about out-of-box template, it display search results like this:
Requirement:
Till this point all looks fine but what if you don’t like this version of format to show user details or may be your end user asked you to add some more information in this details like manger name or more. Definitely you require to do some custom code here. But question come where can we make change to make this happen.
Solution:
SharePoint display template by default gives you manager’s account name. I can easily be find out by debugging under developer’s tools(F12 of browser). Here are the steps:
Navigate to Search result page where page is returning any results in terms of people.(/Pages/peopleresults.aspx?k=)
Now press F12 of the browser, i recommend to use chrome for this purpose since it is very easy to locate resources in chrome.
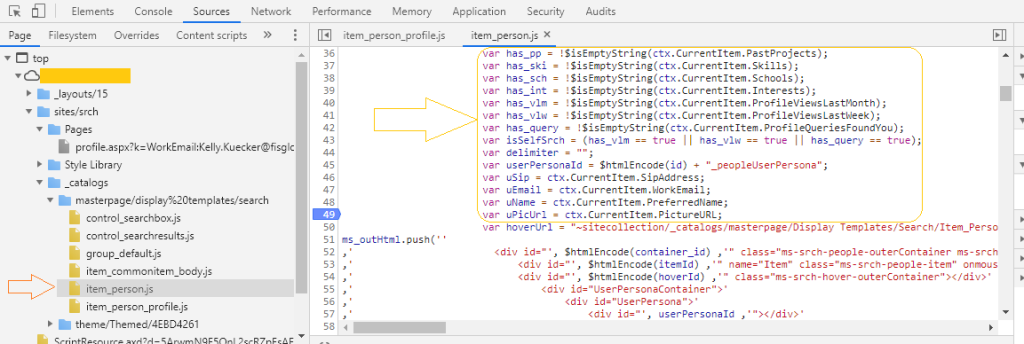
Under developer tools screen click on Sources tab. This will list down folders on left. Under _catalog folder expand /masterpage/display%20templates/search click on file “item_person.js”
Now this is the key file which is used by sharepoint search page to render details of any person.
Place a debugger and check out all the values that are out-of-box available. Here you will notice that for manager there is account name present. “ctx.CurrentItem.Manager“
It is very easy to locate what we are looking for. But friend no, life is not so easy in SP world, real challenge begins when you came to know that this field does not have name of manager. It have account name.
So Looks like you are on the right track by getting the manager accountID which isn’t useful to users in a display template. You can use this to get the rest of the profile information. The follow steps should get you going:
Create a new “var” at the top of the template: var currentManager = ctx.CurrentItem.Manager so that you can call the variable later.
Update targetUser to targetUser = currentManager so we can get their profile info.
The script will give you the PreferredName and Department, add any additional info that you need.
Depending where exactly you want this information display, go to the area in the template that you want to show the manager’s name and put the following <div id=”ManagerValue”></div>
go back to the onRequestSuccess fuction that is called if the call is successful and get rid of everything inside the function and enter the follow. $get(“ManagerValue”).innerHTML = personProperties.get_displayName(); you can also add addition <div> tags with additional information about the manager and add additional steps to the success function to show additional profile data about the manager. keep in mind you read the array from 0 up.. in the article the second profile data was the department, so you would add a div tag like <div id=”managerDept”></div> and add a success function step of document.getElementById(‘managerDept’) = userProfileProperties[1];
Now save that and that will update the div to show the manager’s friendly name.
Let me share complete code for your reference so that it will be easier to just copy and paste without making any further efforts:
var has_mgr = !$isEmptyString(ctx.CurrentItem.Manager);
if(has_mgr == true) {
ms_outHtml.push(''
,'                                            <div id="ManagerField">'
);
                                                var encodedMgr = $htmlEncode(ctx.CurrentItem.Manager);
                                                var displayMgr = Srch.U.getSingleHHXMLNodeValue(hhProps, "manager");
                                                if ($isEmptyString(displayMgr)) { displayMgr = encodedMgr }
												SP.SOD.executeFunc('sp.js', 'SP.ClientContext', getUserProperties);
function getUserProperties() {

SP.SOD.executeFunc('userprofile', 'SP.UserProfiles.PeopleManager', function() {
      // Replace the placeholder value with the target user's credentials.
    var targetUser = $get("ManagerValue").innerHTML.trim();

    // Get the current client context and PeopleManager instance.
    var clientContext = new SP.ClientContext.get_current();
    var peopleManager = new SP.UserProfiles.PeopleManager(clientContext);

    // Get user properties for the target user.
    // To get the PersonProperties object for the current user, use the
    // getMyProperties method.
    personProperties = peopleManager.getPropertiesFor(targetUser);

    // Load the PersonProperties object and send the request.
    clientContext.load(personProperties);
    clientContext.executeQueryAsync(onRequestSuccess, onRequestFail);
   });
 }
// This function runs if the executeQueryAsync call succeeds.
function onRequestSuccess() {
	$get("ManagerValue").innerHTML = personProperties.get_displayName();
}

// This function runs if the executeQueryAsync call fails.
function onRequestFail(sender, args) {
    console.log("Error: " + args.get_message());
}

ms_outHtml.push(' '
,'                                                <span class="label">Manager :</span><div id="ManagerValue" class="ms-srch-ellipsis" title="', encodedOff ,'"> ', displayMgr ,' </div>'
,'                                            </div>'
);
                                        }
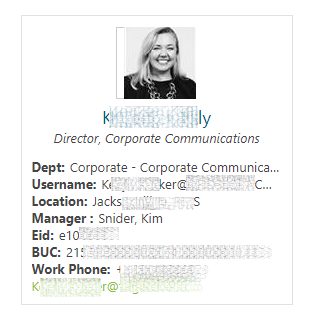
Bingo !! This code does magic for us and get manager’s display name on basis of manager’s account name. Here is the screen shot what I got after running this code:
Hope my blog saved your time or guided you towards in direction of your goals.
There are number of ways to access the SharePoint API to fetch or update its resources. In all the ways, the authentication plays the important role in authorizing the access to get the information. As a developer, you may very much interested in using the PostMan tool for accessing the REST APIs.
Postman Chrome Extension
This is a developer friendly tool for handling the REST APIs from any platform. By using this tool we’ll fetch or update any information from SharePoint using REST API endpoints. We can get this utility from chrome extension and you can get that from this link PostMan Chrome Extension.
Postman & SharePoint Rest endpoints
If you are new to SharePoint REST API or you want to know more about REST endpoints in SharePoint; visit the link Get to know the SharePoint 2013 REST service.
Now we have some understanding about PostMan tool & SharePoint Rest API endpoints. Now we’ll start testing the SharePoint REST API with this tool.
Example
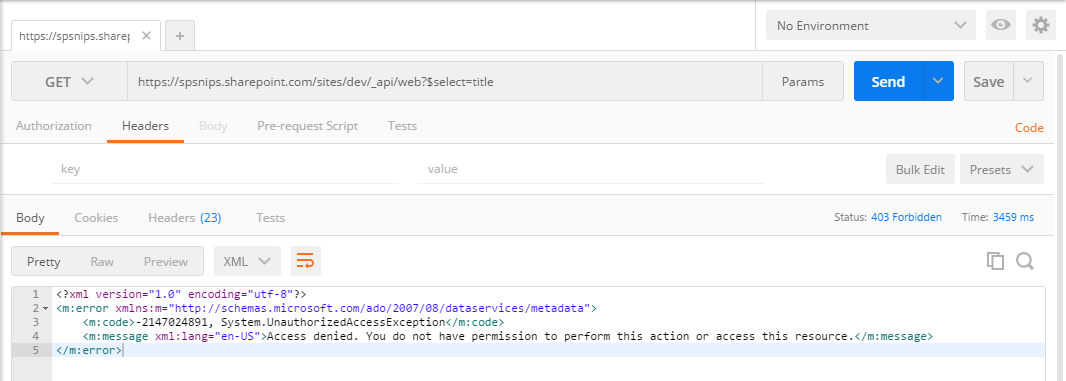
Let’s take a simple example like, getting the web title from the current site context. The equivalent syntax for retrieving the website’s title is
After entering the above URL in the text-box in the URL text-box. We will get the Unauthorized exception on accessing the information. Because SharePoint Online is very much secured and that doesn’t allow anonymous users to access the information for their site. The below is the error message response, after sending the request.
.
Fig 1: UnAuthorized from Postman
To avoid the Unauthorized exception, we have to add some request header values to the API request. Authentication and Authorization of SharePoint Add-Ins gives the overview of authorizing the Add-ins to access SharePoint resources by the APIs.
Authentication Policies:
SharePoint online considers any one of the below three type of polices to authenticate the Add-In.
User Policy
Add-In Policy – We are using this policy to authenticate the external system to access SharePoint
User +Add-In Policy
Request Headers:
And, we require the following information in various requests to authenticate with SharePoint online site.
Client Id
Client Secret
Realm (Tenant Id)
Access Token
Authorize Postman to access SharePoint
To get authorized from external system, we should pass access-token value as a request header along with the REST API URL. Before that we have to get the access-token, for that we should generate Client Id and Secret information from the site by registering as an App only Add-In in SharePoint site. This is same as like registering add-in for Provider Hosted Add-In.
I have provided the steps below to get the Tenant Id, Access Token and data from SharePoint using PostMan utility.
Register Add-In
On initial stage, we have to register the Add-In in SharePoint, where we want to access the information. Follow the steps below to register the Add-In in SharePoint site.
Navigate and login to SharePoint online site.
Then navigate to the Register Add-In page by entering the url as
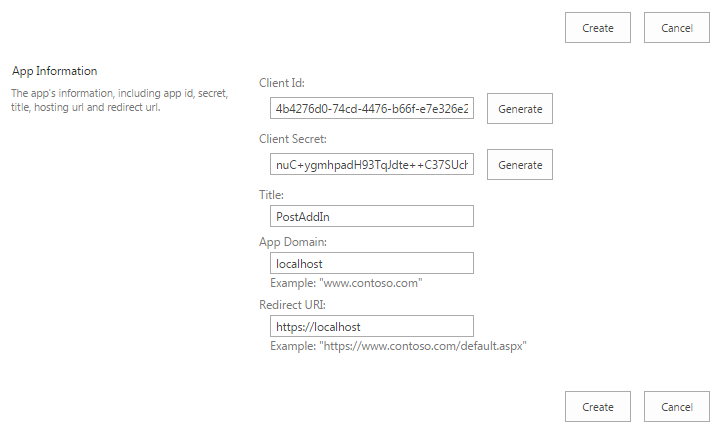
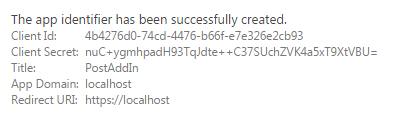
Click Create button, which registers the add-in and returns the success message with created information.
Fig 3: Add-In Registration Successful
Grant Permissions to Add-In
Once the Add-In is registered, we have to set the permissions for that add-in to access the SharePoint data. We will set the Read permission level to the web scope, so that we will be able to read the web information.
Navigate to the SharePoint site
Then enter the URL https://<sitename>.sharepoint.com/_layouts/15/appinv.aspx in the browser. This will redirect to Grant permission page.
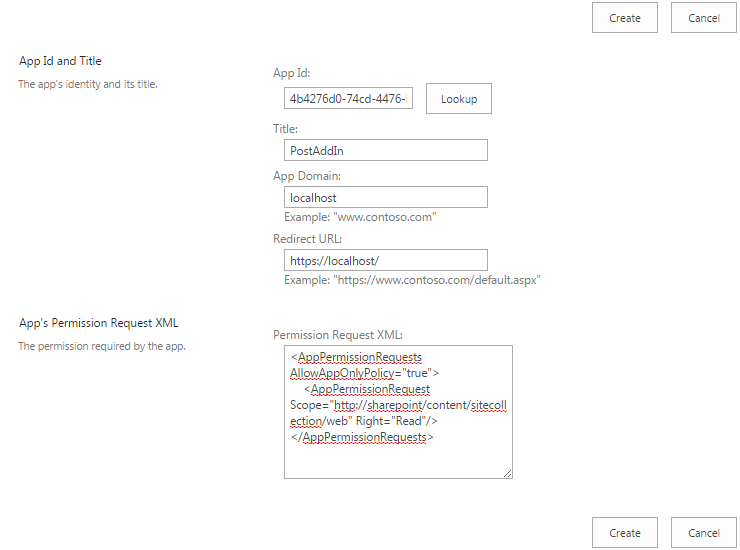
Enter the Client ID(which we have generated earlier), in AppId textbox and click Lookup button. That will populate the value to other textboxes in Title, App Domain and Redirect Url
Fig 4: Set Permissions to Add-In
Now enter the below permission request in XML format.
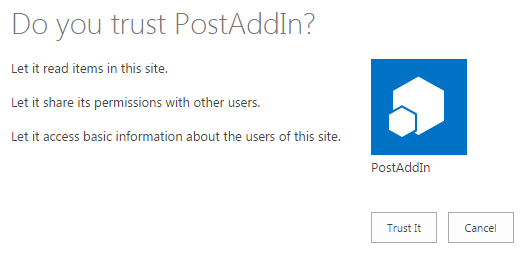
Then click Create button. This will redirect to you page, where we have to trust the add-in to read items from website.
Fig 5: Trust Add-In
Note: If we want to access site collection or tenant level, we have add the xml accordingly
Retrieve the Tenant ID
Once we registered the Client Id and Secret with the permissions, we are ready to access the SharePoint information from external system or tools.
At first, we have to know the Tenant ID. Follow the below steps to obtain that information from postman. Postman helps to get the tenant Id by requesting the below url with Authorization header.
Configure the below information in the header section to send along with the url requestMethod = Get Headers
KEY
SYNTAX
VALUE
Authorization
Bearer
Bearer
After applied the configuration, click Send button. The response returns lot of headers but ends with unauthorized access. Fig 6: Get Tenant ID from SharePoint Online
Generate the Access Token
In response header, we will get WWW-Authenticate as one of the header and that contains the necessary information required for next step. The realm value contains the tenant id for the SharePoint Online site and clientid value contains the resource information (we’ll use it later).
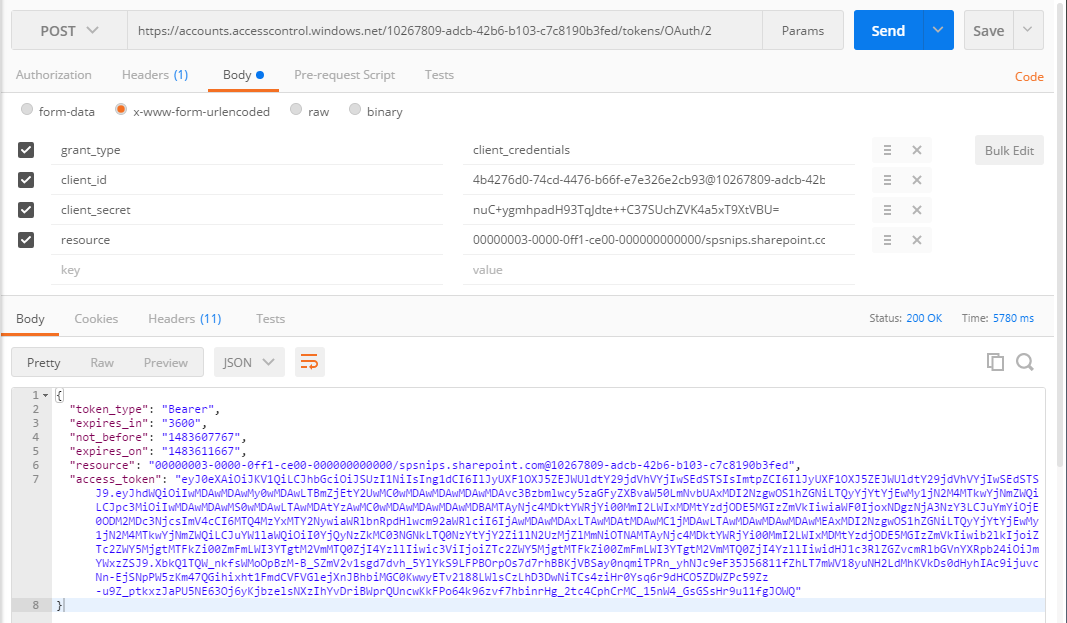
After applying the configuration, click Send button. That will returns the response with the Access Token.
Fig 7: Postman response contains Access Token
Once we are received the access token, its like we got the authorization to access the SharePoint data based on the permission applied in Grant Permission as Add-In section.
We have to pass the access token as “token_type access_token”
Access the SharePoint resource
Now we have the access token, So we can now pass this token in Authorization header with the SharePoint REST API to get the information.
In Postman tool, add the below URL to retrieve the web title
After applying the configuration, click Send button.
We will get the response successful as below if the permission xml applied correctly in appinv page. Otherwise we will get the access denied error message.
A very basic requirement under the SharePoint Calendar list is to hide All Day Event column from all the forms and libraries. It looks very easy but unfortunately there is not direct way of implementing this change. One have to install SharePoint designer in order to achieve this requirement. Let explain in this blog how this requirement will be materialized.
Problem:
Hide “All Day Event” column from the new form of the calendar list. This is the requirement in my case, may be you want to hide “Recurrence” column. Steps should be same in case of any out-of-box column.
You must have tried to find out the ways to hide this column from List settings > columns details. Firstly, this column is part of “Event” content type and will only be find under content type settings. Ok, seems easy, just visit CT settings and mark it hide.
Well, life is not so easy in this arena. These three columns are not allowed to update as these are handled by SharePoint itself.
Solution:
Install SharePoint Designer on your machine. It works for all version of sharepoint so SPD is the best option to make changes.
Open the SharePoint site where Calendar list resides.
Click on the List and Libraries sections.
Find out where the Calendar list of present and click to open this list.
While you are under List details screen on right portion of the screen, find out Content types section.
There must be “Event” content type visible under the list content types. Click on the content type “Event” to open its details.
Now under customization section, click “Edit content type columns” option. This will navigate you to a columns details page.
On this screen, select “All Day Event”.
Under Property column you can see three options. From the drop down select Hidden(Will not appear in forms)
Or, When you have selected “All Day Event” column, navigate to top ribbon and select “Administrative Web Page”
It will navigate you on a browser and open a page where you can easily select option: Hidden(Will not appear in forms)
I hope this information will be helpful and save lot of time. Do not forget to like this article if it was valuable information for you.
Recently, I faced an issue while working with SP Online blog site. This issue applies to other versions of SharePoint as well.
If you are working on blogs on SharePoint platforms, you might have faced an issue when trying to filter blog posts based on category by hitting the category link shown on the Quick Launch or the category associated to the post. Doing so returns ALL posts what ever the category you asked to display (as shown below).
Steps To Reproduce:
There could be multiple reasons of this issue. Mainly, “Category.aspx” page is responsible for rendering this kind of display. You must be very cautious when doing any changes on this page. This page does not have any check-in/check-out or publishing feature so you can not revert to previous version of this page. In case you broke the linking between blog tools and other web parts it is very hard to restore it in working stage. Most of the blog sites recommend you to recreate blog site again(you will loose all blogs).
In my case, I landed up to this issues by following below two steps:
Go to the Posts list settings to enable Content Approval
Then disable the Content Approval
This has been confirmed and escalated for resolution. It appears this is because the XML query is being modified by removing the category filtering.
However, in the mean time, here is a workaround.
WORKAROUND
Create a blog site and do not enable the Content Approval(This step is only for getting unmodified code for reference)
Using SharePoint Designer open the new blog site and browse to All files\Lists\Categories and edit the category.aspx page
Open your faulty blog site and do the same (edit the category.aspx page)
Locate the following code (NOTE: the GUID is the specific one to your environment)


