Trigger a SP workflow on a timer basis: Information management policies


http://www.wardpeter.com/?p=1055

Steps:

Configure settings on Document Library:

  1. Open SharePoint Site and go to Library Settings of document library where you want to configure Information Management Policies.
  2. On Library Settings Page click on the Content Type for which you want to configure Information Management Policies. E.g.:
  3. On Content type settings page click on “Information management policy settings”
  4. On Edit Policy Page, click on “Enable Retention” checkbox so the Add a retention stage link will be visible. Click on Add a retention stage link.
  5. On Stage properties dialog specify following input for time period:
    1. Select “Created” field in the columns dropdown.
    2. And specify 0 in the textbox and select days in the dropdown.
  6. On Stage properties dialog select “Start a workflow” in the action dropdown and in start this workflow dropdown select the workflow that you want to start and click on OK button in the dialog.
  7. Click on OK button on Edit Policy Page.

Change the schedule of Information management policies timer jobs

  1. Open SharePoint Central Administration Site and go to Monitoring -> Review job definitions.
  2. On Job Definitions Page, look for the “Information management policy” timer job for the web application where you have configured Information management policy on document library.
  3. On Edit Timer Job Page change the schedule to run every 1 min as follows:
    • Select Minutes radio button.
    • And specify 1 in the textbox.
    • Click on OK button.
  4. Again go to Job Definitions Page, look for the “Expiration policy” timer job for the web application where you have configured Information management policy on document library.
    • Select Minutes radio button.
    • And specify 2 in the textbox.
    • Click on OK button.
  5. Now workflow will be triggered approximately 3-5 minutes after a new document or form is created in your library using the content type for which you configured Information management policy.

Notes:

If you do any changes in workflow publish the workflow after configuring the information management policies then you will need to update the workflow in Information management policies settings as follows:

  1. Go to Information management policies settings of content type as mentioned in above steps(1 to 3)
    1. Click on “Edit” option for the retention policy.
    2. If you see the workflow then it must be showing Previous version in the Start this workflow dropdown as shown in the below screen shot.
    3. So change the workflow in the Start this workflow dropdown to the actual workflow that you want to run and click on OK button.
    4. Click on OK button on Edit Policy page.

Happy SharePointing !!
Search Display Template: Show manager display name


In this post, I will explain how you can display the any user manager’s information in search display template. I assume here that you already have search configured on your SharePoint environment and basic knowledge of managed properties and search display template.

SharePoint introduced a technique for presenting search results: Display Templates during its 2013 release. If you have worked in previous versions of SharePoint and had to modify the look and feel of Search Results you know how cumbersome it is. After SP 2013 this rendering techniques have several distinct advantages.

  • Display templates are HTML and JavaScript rather than XSL
  • Display templates are configured for the Site and Site Collection rather than for a Web part
  • Display templates are applied with rules and logic
  • Display templates are applied to individual result items, not the entire result set
  • Display Templates are used for Results of all kinds, search results, content by search results, and refiners

If we talk about out-of-box template, it display search results like this:

Requirement:

Till this point all looks fine but what if you don’t like this version of format to show user details or may be your end user asked you to add some more information in this details like manger name or more. Definitely you require to do some custom code here. But question come where can we make change to make this happen.

Solution:

SharePoint display template by default gives you manager’s account name. I can easily be find out by debugging under developer’s tools(F12 of browser). Here are the steps:

  1. Navigate to Search result page where page is returning any results in terms of people.(/Pages/peopleresults.aspx?k=)
  2. Now press F12 of the browser, i recommend to use chrome for this purpose since it is very easy to locate resources in chrome.
  3. Under developer tools screen click on Sources tab. This will list down folders on left. Under _catalog folder expand /masterpage/display%20templates/search click on file “item_person.js”
  4. Now this is the key file which is used by sharepoint search page to render details of any person.
  5. Place a debugger and check out all the values that are out-of-box available. Here you will notice that for manager there is account name present. “ctx.CurrentItem.Manager
  6. It is very easy to locate what we are looking for. But friend no, life is not so easy in SP world, real challenge begins when you came to know that this field does not have name of manager. It have account name.

So Looks like you are on the right track by getting the manager accountID which isn’t useful to users in a display template. You can use this to get the rest of the profile information. The follow steps should get you going:

  1. Create a new “var” at the top of the template: var currentManager = ctx.CurrentItem.Manager so that you can call the variable later.
  2. At the bottom of the template add the function in this article. https://msdn.microsoft.com/en-us/library/office/jj920104.aspx where you can call multiple profile properties (its the second last JavaScript code example in the article)
  3. Update targetUser to targetUser = currentManager so we can get their profile info.
  4. The script will give you the PreferredName and Department, add any additional info that you need.
  5. Depending where exactly you want this information display, go to the area in the template that you want to show the manager’s name and put the following <div id=”ManagerValue”></div>
  6. go back to the onRequestSuccess fuction that is called if the call is successful and get rid of everything inside the function and enter the follow. $get(“ManagerValue”).innerHTML = personProperties.get_displayName(); you can also add addition <div> tags with additional information about the manager and add additional steps to the success function to show additional profile data about the manager. keep in mind you read the array from 0 up.. in the article the second profile data was the department, so you would add a div tag like <div id=”managerDept”></div> and add a success function step of document.getElementById(‘managerDept’) = userProfileProperties[1];
  7. Now save that and that will update the div to show the manager’s friendly name.

Let me share complete code for your reference so that it will be easier to just copy and paste without making any further efforts:

var has_mgr = !$isEmptyString(ctx.CurrentItem.Manager);
if(has_mgr == true) {
ms_outHtml.push(''
,'                                            <div id="ManagerField">'
); 
                                                var encodedMgr = $htmlEncode(ctx.CurrentItem.Manager);
                                                var displayMgr = Srch.U.getSingleHHXMLNodeValue(hhProps, "manager");
                                                if ($isEmptyString(displayMgr)) { displayMgr = encodedMgr }
												SP.SOD.executeFunc('sp.js', 'SP.ClientContext', getUserProperties);
function getUserProperties() {

SP.SOD.executeFunc('userprofile', 'SP.UserProfiles.PeopleManager', function() {
      // Replace the placeholder value with the target user's credentials.
    var targetUser = $get("ManagerValue").innerHTML.trim();

    // Get the current client context and PeopleManager instance.
    var clientContext = new SP.ClientContext.get_current();
    var peopleManager = new SP.UserProfiles.PeopleManager(clientContext);

    // Get user properties for the target user.
    // To get the PersonProperties object for the current user, use the
    // getMyProperties method.
    personProperties = peopleManager.getPropertiesFor(targetUser);

    // Load the PersonProperties object and send the request.
    clientContext.load(personProperties);
    clientContext.executeQueryAsync(onRequestSuccess, onRequestFail);
   });
 }
// This function runs if the executeQueryAsync call succeeds.
function onRequestSuccess() {
	$get("ManagerValue").innerHTML = personProperties.get_displayName();
}

// This function runs if the executeQueryAsync call fails.
function onRequestFail(sender, args) {
    console.log("Error: " + args.get_message());
}	
	
ms_outHtml.push(' '
,'                                                <span class="label">Manager :</span><div id="ManagerValue" class="ms-srch-ellipsis" title="', encodedOff ,'"> ', displayMgr ,' </div>'
,'                                            </div>'
); 
                                        }

Bingo !! This code does magic for us and get manager’s display name on basis of manager’s account name. Here is the screen shot what I got after running this code:

Hope my blog saved your time or guided you towards in direction of your goals.

Don’t forget to comment and like !

Happy SharePointing !!
Create a workflow with elevated permissions by using the SharePoint Workflow platform


Hello,

There are various reasons that one requires elevated privileges to list/site workflow. Most common use case is, if workflow need to fetch data from some other list/library at site collection/sub site level.

SharePoint App-Only is the older, but still very relevant, model of setting up app-principals. This model works for both SharePoint Online and SharePoint 2013/2016 on-premises and is ideal to prepare your applications for migration from SharePoint on-premises to SharePoint Online. Below steps show how to setup an app principal with tenant full control permissions, but obviously you could also grant just read permissions using this approach.

Applies To
  • SharePoint 2013/2016
  • SharePoint Online

This blog is also targets resolution of following error:

The Workflow was Suspended with Unauthorized HTTP

OR

Unauthorized HTTP to /_vti_bin/client.svc/web/lists

Issue:

By default, the SharePoint workflow doesn’t have sufficient permission to access the SharePoint lists, and this process requires a full control permission level.

Some important point before enabling App Step:

  • To allow the workflow to use APP permissions, you must be a Site Owner or Site Collection Administrator.
  • App Step can be activated at Tenant/Site Collection/Web.
  • The Workflow Manager platform must be configured properly to be able to activate “Workflows can use app permissions” feature.
  • The App Management Service must be configured to be able to grant a full control permission to a workflow.
  • App step provides the workflow authorization for its Identity as a Full Control and ignores the current user permission.
  • The SharePoint 2010 workflow is not supported in App Step,
  • If you don’t elevate the permissions for the SharePoint Workflow, The App Step will be disabled in the SharePoint Designer.

Solution:

To begin the elevation process, follow below steps:

  1. Allow workflow to use app permissions
  2. Grant full control permission to a workflow
  3. Develop the workflow actions inside an App Step using SharePoint Designer

Lets deep dive in details of all three steps mentioned above.

I. Allow workflow to use app permissions: 

The Workflow Manager platform must be configured properly to be able to activate “Workflows can use app permissions” feature. This feature is scoped to the web level feature so in case of site collection or web. This feature is available under web features.

  • Open the SharePoint Site > Site Settings.
  • Below Site Actions > Select Manage site features.
  • Activate Workflows can use app permissions feature.

In above step, we have ensured that after activating this feature, workflow can able to use permission which we will define under next step.

II.  Grant full control permission to a workflow

  • Open the SharePoint Site Collection > Site Settings >Below Users and Permissions > Click on Site App Permissions.

  • Copy the client section of the App Identifier. The App Identifier is the identifier Guid between the last “|” and the “@” sign, as shown below.

  • Navigate to grant permission to an app page by browsing the “appinv.aspx” page of the web site.

http://siteurl/_layouts/15/appinv.aspx.

  • Paste the client section of App Identifier to the App Id field.
  • Click Lookup to fetch the required info.
  • The App Management Service must be configured to be able to lookup your identifier. If the App Management Service is not installed you will get the below error when you clicked on Lookup button.

  • Paste the below APP Permissions Request XML to grant full control permission. Make sure tags and attribute names are in correct casing because small case will not be detected.

<AppPermissionRequests AllowAppOnlyPolicy="true">
<AppPermissionRequest Scope="http://sharepoint/content/sitecollection/web" Right="FullControl">
</AppPermissionRequest></AppPermissionRequests>


  • You will then be asked to trust the Workflow app, Click Trust It.

III. Develop the workflow actions inside an App Step using SharePoint Designer

The App Step option will be disabled in the SharePoint Designer, in case you are not followed above mentioned steps. Using App step will allow the workflow to be authorized with its identity as a Full Control and ignore the current user permissions. This is will ensure that the workflow will be executed successfully in case the current user has no permissions.

Good to Go !! Once it is added it to workflow, it is easy to write any action under it.

NOTE: If you still see app step as disabled then close the SPD instance and reopen it. If still not see it enabled, then make sure you have done above steps in correct site collection/web.

NOTE: Make sure, Under Workflow Settings >  Uncheck the “Automatic updates to workflow status to the current stage name“, then click Publish.

If you didn’t uncheck “Automatic updates to workflow status to the current stage name“, the current user will require Edit permission on the list to can edit the workflow status.

Happy SharePointing !!

JQuery: Get Rid off SharePoint Spell Check


Hi Guys,

After spending 3-4 hours of struggle, I finally found way to get rid off irritating SharePoint Spell checker. It caught people picker too under the umbrella of spell check, but why, usually it does not required. Well again it may be the requirement.

But for my case, I don’t want it to watch any of my control on whole site. I tried to navigate to Manage Farm Features > Spell Check feature. Even after deactivating this feature it still working like a stubborn functionality. Then I realized that nothing is impossible for a developer. I have JQuery with me I can hide that control.

Resolution:

1) Hiding spell check from the Ribbon: in order to hide the spell check feature to end user, trick that worked for me is to add following line in my custom js:

$(‘a:has(img[src*=”images/spellingHH.png”])’).parents(“li”).hide();

2) Exclude fields from the spell check feature: I have created follwoing method to exclude people picker and other inputs fields from spell check:

function DisableSpellCheck() {
var tagclass = $(“input”).attr(‘class’);
if (tagclass !== undefined) {
tagclass = tagclass.replace(‘ ms-spellcheck-true’, ”);
}
$(“.input”).attr(‘class’, tagclass);

var $fld_in = $(“div.authorEdit input”);
var $fld_tx = document.getElementsByTagName(‘textarea’);

for ($i = 0; $i < $fld_in.length; $i++) {
var $inputName = $fld_in[$i].getAttribute(‘name’);
if ($inputName.indexOf(‘UserField’) != -1) {
$fld_in[$i].className = ‘ms-spellcheck-false’;
}
}
for ($i = 0; $i < $fld_tx.length; $i++) {
var $inputName = $fld_tx[$i].getAttribute(‘name’);
if ($inputName.indexOf(‘UserField’) != -1) {
$fld_tx[$i].setAttribute(“excludeFromSpellCheck”, “true”);
}
}
}

Note: “authorEdit” is the custom class added to the people picker.

If you add this line of code to your master page or document.ready function of the page layout it will solve this issue.

Hope this little trick might helpful.

Happy SharePointing :)!!

Powershell: Change Like and comments settings of a library


Hi,

Recently I was working on the requirement to enable the like and comments settings of any library. So I prefer to use PowerShell script for same. I am sharing the code as below:

function Change-SettingsForLikeComment()
{
# Change page library settings for Likes and comments
$list=$web.Lists[“Pages”];
if($list -ne $null)
{
Write-Host $list.Title “not null”;
$assembly=[System.Reflection.Assembly]::Load(“Microsoft.SharePoint.Portal, Version=15.0.0.0, Culture=neutral, PublicKeyToken=71e9bce111e9429c”)
$reputationHelper =$assembly.GetType(“Microsoft.SharePoint.Portal.ReputationHelper”);

$bindings = @(“EnableReputation”, “NonPublic”, “Static”);
[System.Reflection.BindingFlags]$flags = [System.Reflection.BindingFlags]::Static -bor [System.Reflection.BindingFlags]::NonPublic;

$methodInfo = $reputationHelper.GetMethod(“EnableReputation”, $flags);

#For enabling Ratings
#$values = @($list, “Ratings”, $false);

#OR for enabling Likes
$values = @($list, “Likes”, $false);

$methodInfo.Invoke($null, @($values));

#For disable Rating or Likes
<#$methodInfo = $reputationHelper.GetMethod(“DisableReputation”, $flags);
$disableValues = @($list);
$methodInfo.Invoke($null, @($disableValues));#>
}
}


This code will work for Pages library as in most of the cases we prefer to use pages library as a news library. One just have to create a $web object by using the command:

$url= “<url of your sute>“;
$web=Get-SPWeb $url;

and call the method:

Change-SettingsForLikeComment

Thatz it for now. Thanks for time.

Will be back with more scripts!!

Classic mode Web Application in Sharepoint 2013


Hi Guys,

I was doing the migration from SP 2010 to SP 2013. The purpose of this post is to discuss how we can easily create classic mode web application in SP 2013.

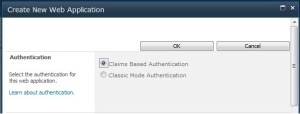
You must be knowing that we are having option to select the authentication mode “Claims based” or “Classic Mode”.

IC423799

But unfortunately in SP 2013 this option is removed. You can only configure claims-based authentication when you manage Web applications in the Central Administration page. This is because claims-based authentication is the default and preferred method of user authentication, and is required to take advantage of server-to-server authentication and app authentication. If you would like to create a Web application with classic mode authentication, you can do this using Windows PowerShell cmdlets. The use of classic mode authentication, also known as Windows classic authentication, is discouraged in SharePoint 2013 and you can only create or configure web applications for classic mode authentication with Windows PowerShell cmdlets.

Prerequisites:

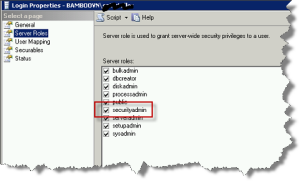
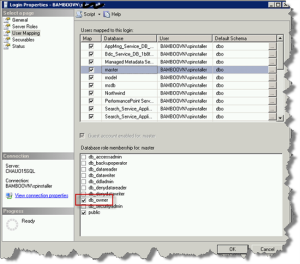
1) The user must have following memberships:

  • securityadmin

                     webapp1.png-550x0

  • db_owner

                     webapp2.png-550x0

Next step is to open the SharePoint 2013 Management Shell. On the Start menu, click All Programs, click Microsoft SharePoint 2013 Products, and then click SharePoint 2013 Management Shell:

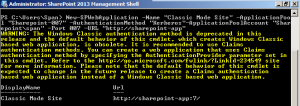
At the Windows PowerShell command prompt, type the following:

New-SPWebApplication -Name <Name> -ApplicationPool <ApplicationPool> -AuthenticationMethod <WindowsAuthType> -ApplicationPoolAccount <ApplicationPoolAccount> -Port <Port> -URL <URL>

Where:

  • <Name>: The name of the new Web application.
  • <ApplicationPool>: The name of the application pool.
  • < WindowsAuthType>: Either NTLM or Kerberos. Kerberos is recommended.
  • <ApplicationPoolAccount>: The user account that this application pool will run as.
  • <Port>: The port on which the Web application will be created in IIS.
  • <URL>: The public URL for the Web application.

For example:

New-SPWebApplication -Name “Classic Mode Site” -ApplicationPool “Sharepoint-007” -AuthenticationMethod “Kerberos”-ApplicationPoolAccount “Sharepoint\span” -Port 007 -URL “http://sharepoint-app&#8221;

                      Capture

So by this way we can easily create the Classic mode web application.

Happy SharePointing

Cheers 🙂

SharePoint: Download a file programatically


Hi All,

Downloading a file from SharePoint using the code is not a typical task. In .net we usually get the binary of the file and check the content type of the file based on extension and then write the binary to the HttpResponse of the page and bingooo!!!!

Its not that much complicated if you are a SharePoint coder. Thing is you just need to have the Url of the file.

As we all know that we can either code server side or client side, so you can choose one of the following solution as per your requirement:

From Code behind:

btnDownload.OnClientClick = “STSNavigate(‘” + SPContext.Current.Web.Url+ “/_layouts/15/download.aspx?SourceUrl=” + documentUrl + “‘ ); return false;”;

From Client side:

//Download file button click event
$(‘#<%=btnDownload.ClientID%>’).click(function (e) {

// Write logic to create the url in my case I was iterating through grid rows and chech which //check box is seleced and then get the Field ref of the item and create the url to download
STSNavigate(‘<%= SPContext.Current.Web.Url %>/_layouts/15/download.aspx?SourceUrl=’ + url);
return false;
});

Using “STSNavigate” method we can navigate to the download.aspx which already having stuff to run for downloading the file. The SourceURL should be the path of the file. It can be path from the document library item.

(Hint: we can create the Url of the file by concatinating “FieldRef and “EncodedAbsUrl” column values of the list Item).

One more important thing, its “return false;” this line will stop the your parent page to reload after downloading finishes.

Well hope my blog is helpful for you 🙂 Please comment if you find it useful.

Happy SharePointing 🙂

CKS Development Tool kit for VS 2012 is Available


Hi,

If you are a SharePoint developer, you must be knowing about the CKS dev tool which helps developers to deploy solutions. No controversy on this fact that this is top most tool to be used for creating SharePoint solutions with Visual Studio. It is really good news for all those who has been egregiously waiting for next release of CKS Tool competible with SharePoint 2013 and VS 2012. Most of the people are using Mavention Quick Deploy in absence of CKS.

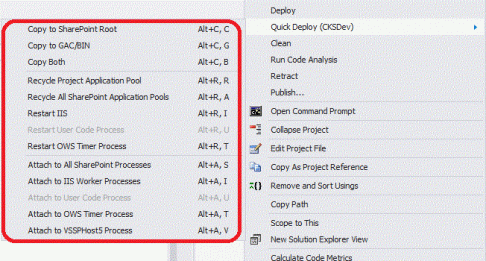
Guys, the moon is not so far from you to touch, have a look on CKS: Development Tools Edition and download this tool and enjoy the easy deployments and upgrades. Once you install this tool you just need to right click on the SharePoint solution and you will get following options:

Image

The modification from the earlier versions:

  • Improvements to Quick Deploy – Performance improvements phase one and some minor defect fixes in GACUtil calls.
  • Existing VS2010 SPI Providers – Projects with existing CKSDev SPIs now supported.
  • SharePoint 2010 Console project template – Project template for a SharePoint 2010 console application.
  • SharePoint 2013 Console project template – Project template for a SharePoint 2013 console application.

Happy SharePointing 🙂

Change Favicon for SP 2013


Hi guys,

Favicon, Sometimes user come across some websites which shows logo instead of explorer logo in Address bar. A typical example is Google, login to Google with IE and watch address bar. You can see Google logo then the URL. This icon is stored in the PC when we add the sites as bookmarks. When you open bookmarks menu the site name will show with the icon.

SharePoint 2013 comes with a blue Favicon FAVICON and it’s resides in SharePoint Root Folder\Template\Images [C:\Program Files\Common Files\Microsoft Shared\Web Server Extensions\15\TEMPLATE\IMAGES\].

Create your own Favicon?
It’s very simple to create favicon. All you need is the company logo or image(in JPG/PNG/GIF format) which you want to create based on and internet connection. Open browser and enter http://tools.dynamicdrive.com/favicon/ . Then click Choose File Button and select your image. Click Create Icon Button. Now the site will create favicon based on image given and it’s ready to download. Download and save it in your PC.

How to set Favicon site?

There are two possible ways to set the favicon:

1) (Not Recommended)Change the default SharePoint Favicon:

Open this folder(C:\Program Files\Common Files\Microsoft Shared\Web Server Extensions\15\TEMPLATE\IMAGES\) and search for favicon.ico and rename the file to FaviconBackup.ico. Now copy your favicon to this folder and make sure it’s named as “favicon.ico”. Now restart IIS(open Command Prompt -> IISReset), clear browser cache/temporary internet files. Close the browser and reopen then browse the SharePoint site.

2) In SharePoint Designer or any other editing tool open your site Master Pages or if you are using default oslo.master, then select the master page that will show the new favicon. Now click “Edit File” link to add the favicon code. If it asks for check out, click yes and continue.
Find <SharePoint:SPShortcutIcon ID=”SPShortcutIcon1″ runat=”server” IconUrl=”/_layouts/images/favicon.ico”/>and change the name of the favicon. Save and close (If you have checked out then you need to check in and site collection administrator has to approve it via Site Settings -> Galleries -> Master pages and page layouts -> Check in and Approve). Now reset IIS/clear browser cache and check.

Cheers !!